说明
Celery是一个异步任务队列/基于分布式消息传递的作业队列。它侧重于实时操作,同时对调度的支持也很好
适用场景
- 可以在 Request-Response 循环之外执行的操作:发送邮件、推送消息
- 耗时的操作:调用第三方 API(前端通过 AJAX 展示进度和结果)
- 周期性任务:取代 crontab
架构设计
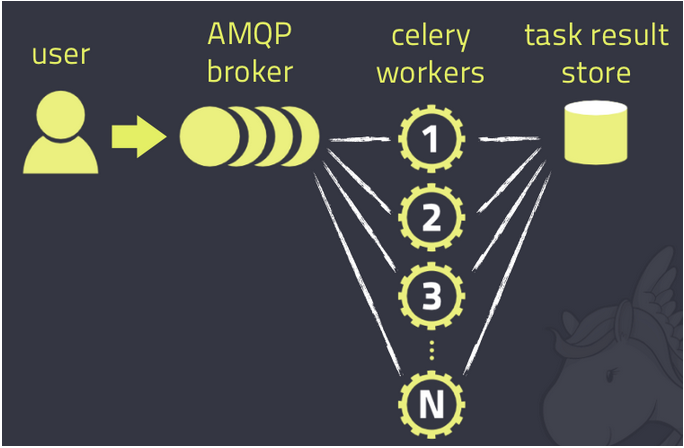
Celery的架构由三部分组成:
消息中间件(message broker):Celery本身不提供消息服务是任务调度队列,通常以服务形式出现,可以方便的和第三方提供的消息中间件集成;包括,RabbitMQ, Redis, MongoDB;
任务执行单元(worker):是Celery提供的任务执行的单元,worker并发的运行在分布式的系统节点中;
任务执行结果存储(task result store):用来存储Worker执行的任务的结果,Celery支持以不同方式存储任务的结果,包括AMQP, Redis,memcached, MongoDB,SQLAlchemy, Django ORM,Apache Cassandra, IronCache
配置启动
配置
1 2 3 4 5 6 7 8 9 10
| # 参数配置 BROKER_URL = 'redis://127.0.0.1:6379' # 指定 Broker CELERY_RESULT_BACKEND = 'redis://127.0.0.1:6379/0' # 指定 Backend CELERY_TIMEZONE = 'Asia/Shanghai' # 指定时区,默认是 UTC CELERY_IMPORTS = ( # 指定导入的任务模块 'celery_app.task1', 'celery_app.task2' ) app.config_from_object('celeryconfig') #将配置导入到celery对象中
|
启动
celery worker -A tasks –loglevel=info –concurrency=5
参数”-A”指定了Celery实例的位置,本例是在”tasks.py”中,celery命令会自动在该文件中寻找Celery对象实例。建议指定Celery对象名称,如”-A tasks.app”。
参数”loglevel”指定了日志等级,也可以不加,默认为warning。也可以使用 -l info来表示
参数”concurrency”指定最大并发数,默认为CPU核数
delay():方法将任务发送到消息队列中,由之前启动worker执行,这时Python控制台上只会返回”AsyncResult”信息。如果你看下之前职程的启动窗口,你会看到多了条日志”Received task: celery_app.task1.add[bec9a333-3af7-43ab-b93d-4a2ae6779058] ETA:[2017-03-12 12:57:08.630629+08:00]”
“delay()”方法,它其实是对”apply_async()”方法的封装,使得你只要传入任务所需的参数即可。对于特殊的任务调度需求,你需要使用”apply_async()”,其常用的参数有:
countdown: 指定多少秒后任务才被执行
eta: 指定任务被调度的时间,参数类型是datetime
expires: 任务过期时间,参数类型可以是int(秒),也可以是datetime
retry: 任务发送失败的重试次数
priority: 任务优先级,范围是0-9
serializer: 参数和返回值的序列化方式
result = add.delay(2,5)
result.ready() #True,用于检查任务执行是否成功
result.get(timeout=1) #7,get方法用于获取任务结果
delay() 方法是 apply_async() 方法的简写
apply_async(args=(), kwargs={}, route_name=None, **options)
这个调用会把 add 操作放入到队列里,然后立即返回一个 AsyncResult 对象
当函数被@app.task装饰后,就成为可被 Celery 调度的任务
应用实例
异步执行任务
目录结构:
1 2 3 4 5 6 7
| - celery_app - __init__.py - celeryconfig.py - init.py - task1.py - task2.py - client.py
|
celeryconfig.py
1 2 3 4 5 6 7 8 9 10 11
| BROKER_URL = 'redis://127.0.0.1:6379' CELERY_RESULT_BACKEND = 'redis://127.0.0.1:6379/0' CELERY_TIMEZONE = 'Asia/Shanghai' CELERY_IMPORTS = ( 'celery_app.task1', 'celery_app.task2' )
|
init.py
1 2 3 4 5 6 7 8 9 10 11 12 13
| ''' Describe:异步执行 启动worker进程;每次修改task代码后,需要restart celery 进程; cd /train/celery_demo && celery worker -A celery_app.init --loglevel=INFO '''python from celery import Celery ttxsgoto = Celery("ttxsgoto") ttxsgoto.config_from_object('celery_app.celeryconfig')
|
task1.py
1 2 3 4 5 6 7 8 9 10
| import time from .init import ttxsgoto @ttxsgoto.task def add(x, y): time.sleep(5) return x + y
|
task2.py
1 2 3 4 5 6 7 8 9 10
| import time from .init import ttxsgoto @ttxsgoto.task def multiply(x, y): time.sleep(10) return x * y
|
client.py
1 2 3 4 5 6 7 8 9 10 11 12 13
| import time import task1 import task2 print "异步执行开始:",time.ctime() task1.add.apply_async(args=(2,8), countdown=5) task2.multiply.delay(3,7) print "end!!!!!" print time.ctime()
|
启动celery并服务,并执行client.py脚本
1 2
| celery worker -A celery_app.init -l info python client.py
|
周期执行任务
目录结构:
1 2 3 4 5 6
| - celery_app_cron - __init__.py - celeryconfig.py - init.py - task1.py - task2.py
|
celeryconfig.py
1 2 3 4 5 6 7 8 9 10 11 12 13 14 15 16 17 18 19 20 21 22 23 24 25 26 27 28 29 30 31 32
| from datetime import timedelta from celery.schedules import crontab from celery import Celery BROKER_URL = 'redis://127.0.0.1:6379' CELERY_RESULT_BACKEND = 'redis://127.0.0.1:6379/0' CELERY_TIMEZONE = 'Asia/Shanghai' CELERY_IMPORTS = ( 'celery_app_cron.task1', 'celery_app_cron.task2' ) CELERYBEAT_SCHEDULE = { 'add-every-30s':{ 'task':'celery_app_cron.task1.add', 'schedule':timedelta(seconds=30), 'args':(3,12) }, 'multiply-erverday-7-10':{ 'task':'celery_app_cron.task2.multiply', 'args':(3,15) } }
|
init.py
1 2 3 4 5 6 7 8 9 10 11 12 13 14
| ''' Describe:定时任务 启动worker进程;每次修改task代码后,需要restart celery 进程; cd /train/celery_demo && celery -A celery_app_cron.init worker --loglevel=INFO cd /train/celery_demo && celery -A celery_app_cron.init beat 放在一起执行: cd /train/celery_demo && celery -B -A celery_app_cron.init worker --loglevel=INFO ''' from celery import Celery ttxsgoto = Celery("cron") ttxsgoto.config_from_object('celery_app_cron.celeryconfig')
|
task1.py
1 2 3 4 5 6 7 8 9 10
| import time from .init import ttxsgoto @ttxsgoto.task def add(x, y): time.sleep(5) return x + y
|
task2.py
1 2 3 4 5 6 7 8 9 10
| import time from init import ttxsgoto @ttxsgoto.task def multiply(x, y): time.sleep(10) return x * y
|
启动celery服务,可以看到执行结果,30s运行一次task1.add
1
| celery worker beat -A celery_app_cron.init -l info
|