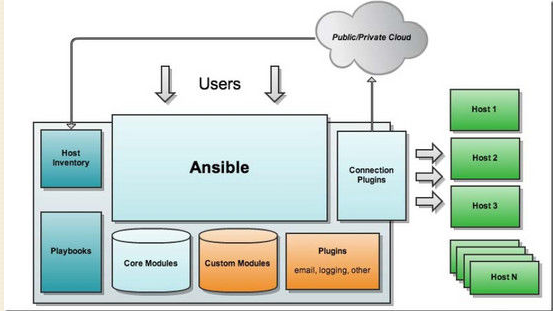
Ansible架构图
Ansible特性 - 基于python实现,由Paramike,PyYAML和Jinjia2三个关键模块
- 部署简单,agentless
- 使用ssh协议
- 主从集中化模式
- 支持自定义模块
- 支持playbook
- 幂等性:一种操作可重复多次结果相同
Ansible核心组件 - ansible core:Ansible的核心程序
- host iventory:记录了每一个由Ansible管理的主机信息,信息包括ssh端口,root帐号密码,ip地址等
- core modules:Ansible管理主机之前,先调用core Modules中的模块,然后指明管理Host Lnventory中的主机,就可以完成管理主机
- custom modules:自定义模块
- playbook(yaml,jinjia2):YAML格式文件,多个任务定义在一个文件中
- connect plugin:连接插件,Ansible和Host通信使用
Invetory文件说明 参数说明:
ansible_ssh_host 将要连接的远程主机名,可用于设置别名
ansible_ssh_port ssh端口,非默认可通过它来设置
ansible_ssh_user 默认的ssh用户名
ansible_ssh_pass ssh密码 不安全
ansible_sudo_pass sudo密码 不安全
ansible_connection 主机连接类型
ansible_ssh_private_key_file ssh 使用的私钥文件.适用于有多个密钥
ansible_shell_type 目标系统的shell类型
ansible_python_interpreter 目标主机的python路径
1
2
3
4
5
6
7
8
9
10
11
12
13
14
15
16
17
18
19
20
21
22
23
24
25
26
27
28
29
30
31
32
33
34
[web01]
192.168.0.1 ansible_ssh_user=root ansible_ssh_pass=xxx
[web02]
192.168.0.[2:5]:2222 #从2到5的主机,如果端口号不是默认22,可直接用:后定义端口号
[web03] #对应变量,供playbooks使用
192.168.0.8 port=80 hostname="test01"
192.168.0.9 port=8080 hostname="test02"
[web03.vpn] #设置别名 访问192.168.0.190 实际访问10.8.0.190
192.168.0.190 ansible_ssh_port=2222 ansible_ssh_host=10.8.0.190
[web03:vars] #对web03组定义变量,供playbooks使用
server1=ttxsgoto1.com
server2=ttxsgoto2.com
[webservers:children] #组嵌套,webservers组包括web01和web02下的主机
web01
web02
[webservers:vars] #组定义变量
server1=tttxsgoto.com
#########################
# 分文件定义host和group #
#########################
- 独立的文件格式为yaml文件
- 在对应的hosts目录中创建host_vars,group_vars目录,该目录存放对应的变量
- host_vars目录用于存放host变量,all文件对所有主机有效
- 目录下的文件名和hosts文件对应的主机和组需要一样
---
# Which version of WordPress to deploy
wp_version: 4.2.4
wp_sha256sum: 42ca594afc709cbef8528a6096f5a1efe96dcf3164e7ce321e87d57ae015cc82
# These are the WordPress database settings
wp_db_name: test
wp_db_user: root
wp_db_password: root
查看模块帮助信息
- ansible-doc -l
- ansible-doc -s  module_name
变量
1
2
3
[web03:vars] #对web03组定义变量,供playbooks使用
server1=ttxsgoto1.com
server2=ttxsgoto2.com
1
2
3
4
5
6
- hosts: webservers #对webservers主机组下的所有主机进行操作
vars: # 为该play定义两个变量
http_port: 80
max_clients: 200
vars_files: # 使用变量文件定义变量
- vars/server_vars.yml
在playbook文件中冒号后面的值不能以”{ “开头,解决办法:要在”{ “开始的值加上引号,如:1
2
3
- hosts: app_servers
vars:
app_path: "{{ base_path }}"
通过系统变量(facts),可直接使用,如ansible_os_family,ansible_ens3.ipv4.address;
运行结果当做变量使用-注册变量,register: result ,debug: msg=”“
文件模板中使用的变量
定义命令行变量如下
用命令行传递参数
-e或者–extra-vars, -e ‘参数名1=值1 参数名2=值2’
json格式传递参数 -e ‘{‘hosts’:’local’, ‘user’:’root’}’
参数放在json文件里面中 -e “@vars.json”
ansible命令应用1
2
3
4
5
ansible <host-pattern> [-f forks] [-m module_name] [-a args]
ansible "web01:web02" -m ping # 多个组执行用:分隔,同时属于多个组的主机只会执行一次
-f forks:启动并发线程数
-m module_name:使用的模块名
-a args:模块特有的参数
常见模块
command
cron
user
group
copy
file
ping
setup
service
shell
script
yum/apt
cron:计划任务1
2
3
present: 安装任务
absent:移除任务
ansible local -m cron -a 'minute=*/5 job="/bin/echo abc > /root/abc.log" name="test cron job" state="absent" '
user:用户管理1
2
- name:指明添加的用户名
- ansible local -m user -a 'name="user1"'
group:用户组管理1
2
ansible local -m group -a 'name=user1 gid=306 system=yes' #添加用户组
ansible local -m group -a 'name=user1 gid=306 system=yes state=absent' #删除用户组
copy:文件复制1
2
3
4
5
src=:定义本地源路径
content=:取代src=,定义内容直接写入到远程文件中
dest=:定义远程路径,绝对路径
ansible local -m copy -a 'src=/etc/fstab dest=/tmp/fstab.bak owner=root mode=777'
ansible local -m copy -a 'content="hello wrold\nabc\n" dest=/tmp/fstab.bak owner=root
file:文件管理属性1
2
3
path=: 指明文件路径,可以使用name、dest来替换
ansible local -m file -a ' owner=bigdata group=bigdata mode=644 path=/tmp/fstab.bak' #修改权限和组信息
ansible local -m file -a 'path=/tmp/fstab.bak.link src=/tmp/fstab.bak state=link' #软链接
ping:测试主机联通性
setup:收集远程主机的facts1
2
#每个被管理节点会将自己相关的信息发生给远程的ansible主机,用于模板调用变量
ansible local -m setup
service:常用服务的运行状态1
2
3
4
enabled=: 开机自启动,为true和false
name=: 服务名称
state=: 启动状态,started,stopped,restarted;
ansible local -m service -a "enabled=true name=nginx state=started"
shell:远程执行命令,可传递参数1
2
#用到管道等功能的复杂命令时使用shell命令
ansible local -m shell -a "echo xxx | passwd --stdin user1"
script:将本地脚本在远程上执行1
2
#注意:使用相对路径指定脚本
ansible local -m script -a "./test.sh"
yum/apt: 安装程序包1
2
3
4
name=: 需要安装的程序包,可以加版本号
state=: present,lastest安装,absent表示卸载
ansible local -m yum -a "name=zsh" #安装
ansible local -m apt -a "name=zsh state=absent" #卸载
playbook 通过yaml将多个模块组装起来运行多个任务https://github.com/ansible/ansible-examples
组成结构:
运行说明:1
2
3
4
5
6
7
8
9
10
11
12
13
14
15
16
17
18
19
20
21
22
--- #任何playbook文件(其实就是yaml文件)都要以这个开头
- hosts: webservers #对webservers主机组下的所有主机进行操作
vars: #为该play定义两个变量
http_port: 80
max_clients: 200
remote_user: deploy #连接到远程主机的用户
sudo: yes #以sudo模式运行该play
sudo_user: root #sudo到哪个用户,默认为root,如果sudo到该用户需要密码,则在执行ansible-playbook的时候指定-K选项来输入sudo密码
tasks: #开始定义task
- name: ensure apache is at the latest version #这既是每个task的说明也是每个task的名字
yum: pkg=httpd state=latest
tags: #给该task打一个标签
- last_http
- name: write the apache config file
template: src=/srv/httpd.j2 dest=/etc/httpd.conf
notify: #提供watch功能,这里当apache配置文件改变时,就调用handlers中名为"restart apache"的task来重启apache
- restart apache
- name: ensure apache is running
service: name=httpd state=started
handlers: #notify通知这里的task执行,说明:定义在handlers下的task只有在notify触发的时候才会执行
- name: restart apache
service: name=httpd state=restarted
1
2
3
4
5
6
7
8
9
10
11
12
13
14
15
16
17
18
19
20
21
22
23
24
25
26
27
28
29
30
31
32
33
34
35
36
37
38
39
40
41
42
43
44
45
46
47
48
49
50
51
52
53
54
55
56
57
58
59
60
61
62
63
64
65
66
67
68
69
70
71
72
73
74
75
76
77
78
79
80
81
82
例子1:
- hosts: webservers
remote_user: root
tasks:
- name: create nginx group
group: name=nginx system=yes gid=208
- name: create nginx user
user: name=nginx uid=208 system=yes
- hosts: dbservers
remote_user: root
tasks:
- name: copy file to dbsrvs
copy: src=/etc/inittab dest=/tmp/inittab.bak
例子2(handler,vars):
- hosts: webservers
remote_user: root
vars:
- package: httpd
- service: httpd
tasks:
- name: install httpd package
yum: name={{ package }} state=lastest
- name: install configuration file for httpd
copy: src=/root/conf/httpd.conf dest=/etc/httpd/conf/httpd.conf
notify:
- restart httpd
- name: start httpd service
service: enabled=true name=httpd state=started
handlers:
- name: restart httpd
service: name=httpd state=restarted
- name: copy file
copy: content="{{ ansible_all_ipv4_addresses }}" dest=/tmp/test.txt
例子3(条件测试):
- hosts: webservers
remote_user: root
vars:
- username: user1
tasks:
- name: create {{ username }}
user: name={{ userneam }}
when: ansible_fqdn == 'ttxsgoto'
例子4(迭代-for):
- hosts: webservers
remote_user: root
- name: add username
user: name={{ item.name }} state=present groups={{ item.groups }}
with_items:
- {name:'testuser1',groups='user1'}
- {name:'testuser2',groups='user2'}
- hosts: webservers
remote_user: root
- name: add username
user: name={{ item }} state=present groups=group1
with_items:
- testuser1
- testuser2
例子5(templates/tags ansible-playbook test.yml --tags='conf_chage'):
#tags: 在playbook可以为某个任务定义一个标签,在执行playbook时,通过tags可实现仅运行指定tasks任务
- hosts: webservers
remote_user: root
vars:
- package: httpd
- service: httpd
tasks:
- name: install httpd package
yum: name={{ package }} state=lastest
- name: install configuration file for httpd
template: src=/root/conf/httpd.conf.j2 dest=/etc/httpd/conf/httpd.conf
tags:
- conf_chage
notify:
- restart httpd
- name: start httpd service
service: enabled=true name=httpd state=started
handlers:
- name: restart httpd
service: name=httpd state=restarted
roles roles:用于层次化、结构化的组织playbook;role能够根据层次结构自动装载变量文件、task以及handlers等,要使用roles只需要在playbook中使用include指令;roles通过分别将变量、文件、任务、模块及处理器放置在单独的目录中,并可以便捷地通过include它们的一种机制,角色一般用于基于主机构建服务的场景中;Roles 的概念来自于这样的想法:通过 include 包含文件并将它们组合在一起,组织成一个简洁、可重用的抽象对象
创建role的步骤如下:
创建以roles命名的目录
在roles目录中分别创建以各角色名称命名的目录,如websrvs等
在每个角色命名的目录中分别创建files、handlers、meta、tasks、templates和vars目录;用不到的目录可以创建为空目录,也可以不创建
在palybook文件中调用各角色
roles内各目录中可用的文件1
2
3
4
5
6
7
tasks目录:至少应该包含一个名为main.yml的文件,其定义了此角色的任务列表include包含其它的位于此目录中的task文件
files目录:存放由copy或script等模块调用的文件
templates目录:template模块会自动在此目录中寻找Jinja2模板文件
handlers目录:此目录中应当包含一个main
vars目录:应当包含一个main.yml文件,用于定义此角色用到的变量
meta目录:应当包含一个main.yml文件,用于定义此角色的特殊设定及其依赖关
default目录:应当包含一个main.yml文件,用于为当前角色设定默认变量
wordpress-nginx 实例如下:
目录结构 1
2
3
4
5
6
7
8
9
10
11
12
13
14
15
16
17
18
19
20
21
22
23
24
25
26
27
28
29
30
31
32
33
34
35
36
37
38
39
40
41
42
./
├── group_vars
│ └── all
├── roles
│ ├── common
│ │ ├── files
│ │ │ ├── epel.repo
│ │ │ ├── iptables-save
│ │ │ └── RPM-GPG-KEY-EPEL-6
│ │ ├── handlers
│ │ │ └── main.yml
│ │ └── tasks
│ │ └── main.yml
│ ├── mysql
│ │ ├── handlers
│ │ │ └── main.yml
│ │ ├── tasks
│ │ │ └── main.yml
│ │ └── templates
│ │ └── my.cnf.j2
│ ├── nginx
│ │ ├── handlers
│ │ │ └── main.yml
│ │ ├── tasks
│ │ │ └── main.yml
│ │ └── templates
│ │ └── default.conf
│ ├── php-fpm
│ │ ├── handlers
│ │ │ └── main.yml
│ │ ├── tasks
│ │ │ └── main.yml
│ │ └── templates
│ │ └── wordpress.conf
│ └── wordpress
│ ├── tasks
│ │ └── main.yml
│ └── templates
│ └── wp-config.php
└── site.yml
21 directories, 18 files
site.yml -入口函数1
2
3
4
5
6
7
8
9
10
11
12
13
14
---
- name: Install WordPress, MySQL, Nginx, and PHP-FPM
hosts: all
remote_user: root
# remote_user: user
# become: yes
# become_method: sudo
roles:
- common
- mysql
- nginx
- php-fpm
- wordpress
group_vars/all -全局变量1
2
3
4
5
6
7
8
9
10
11
12
13
14
15
16
17
18
19
20
21
22
23
24
25
26
---
# Which version of WordPress to deploy
wp_version: 4.2.4
wp_sha256sum: 42ca594afc709cbef8528a6096f5a1efe96dcf3164e7ce321e87d57ae015cc82
# These are the WordPress database settings
wp_db_name: wordpress
wp_db_user: wordpress
wp_db_password: secret
# You shouldn't need to change this.
mysql_port: 3306
# This is used for the nginx server configuration, but access to the
# WordPress site is not restricted by a named host.
server_hostname: www.example.com
# Disable All Updates
# By default automatic updates are enabled, set this value to true to disable all automatic updates
auto_up_disable: false
#Define Core Update Level
#true = Development, minor, and major updates are all enabled
#false = Development, minor, and major updates are all disabled
#minor = Minor updates are enabled, development, and major updates are disabled
core_update_level: true
common roles/common/tasks/main.yml1
2
3
4
5
6
7
8
9
10
11
12
13
14
15
16
---
- name: Install libselinux-python
yum: name=libselinux-python state=present
- name: Reload ansible_facts
setup:
- name: Copy the EPEL repository definition
copy: src=epel.repo dest=/etc/yum.repos.d/epel.repo
- name: Create the GPG key for EPEL
copy: src=RPM-GPG-KEY-EPEL-6 dest=/etc/pki/rpm-gpg
- name: Set up iptables rules
copy: src=iptables-save dest=/etc/sysconfig/iptables
notify: restart iptables
roles/common/handlers/main.yml1
2
3
---
- name: restart iptables
service: name=iptables state=restarted
mysql roles/mysql/tasks/main.yml1
2
3
4
5
6
7
8
9
10
11
12
13
14
15
16
17
18
19
20
---
- name: Install Mysql package
yum: name={{ item }} state=present
with_items:
- mysql-server
- MySQL-python
- libselinux-python
- libsemanage-python
- name: Configure SELinux to start mysql on any port
seboolean: name=mysql_connect_any state=true persistent=yes
when: ansible_selinux.status == "enabled"
- name: Create Mysql configuration file
template: src=my.cnf.j2 dest=/etc/my.cnf
notify:
- restart mysql
- name: Start Mysql Service
service: name=mysqld state=started enabled=yes
roles/mysql/handlers/main.yml1
2
3
---
- name: restart mysql
service: name=mysqld state=restarted
roles/mysql/templates/my.cnf.j21
2
3
4
5
6
7
8
9
10
11
[mysqld]
datadir=/var/lib/mysql
socket=/var/lib/mysql/mysql.sock
user=mysql
# Disabling symbolic-links is recommended to prevent assorted security risks
symbolic-links=0
port={{ mysql_port }}
[mysqld_safe]
log-error=/var/log/mysqld.log
pid-file=/var/run/mysqld/mysqld.pid
nginx roles/nginx/tasks/main.yml1
2
3
4
5
6
7
---
- name: Install nginx
yum: name=nginx state=present
- name: Copy nginx configuration for wordpress
template: src=default.conf dest=/etc/nginx/conf.d/default.conf
notify: restart nginx
roles/nginx/handlers/main.yml1
2
3
---
- name: restart nginx
service: name=nginx state=restarted enabled=yes
roles/nginx/templates/default.conf1
2
3
4
5
6
7
8
9
10
11
12
13
14
15
16
17
18
19
20
21
22
23
24
25
26
27
28
29
30
31
server {
listen 80 default_server;
server_name {{ server_hostname }};
root /srv/wordpress/ ;
client_max_body_size 64M;
# Deny access to any files with a .php extension in the uploads directory
location ~* /(?:uploads|files)/.*\.php$ {
deny all;
}
location / {
index index.php index.html index.htm;
try_files $uri $uri/ /index.php?$args;
}
location ~* \.(gif|jpg|jpeg|png|css|js)$ {
expires max;
}
location ~ \.php$ {
try_files $uri =404;
fastcgi_split_path_info ^(.+\.php)(/.+)$;
fastcgi_index index.php;
fastcgi_pass unix:/var/run/php-fpm/wordpress.sock;
fastcgi_param SCRIPT_FILENAME
$document_root$fastcgi_script_name;
include fastcgi_params;
}
}
php-fpm roles/php-fpm/tasks/main.yml1
2
3
4
5
6
7
8
9
10
11
12
13
14
15
16
17
18
19
20
21
22
---
- name: Install php-fpm and deps
yum: name={{ item }} state=present
with_items:
- php
- php-fpm
- php-enchant
- php-IDNA_Convert
- php-mbstring
- php-mysql
- php-PHPMailer
- php-process
- php-simplepie
- php-xml
- name: Disable default pool
command: mv /etc/php-fpm.d/www.conf /etc/php-fpm.d/www.disabled creates=/etc/php-fpm.d/www.disabled
notify: restart php-fpm
- name: Copy php-fpm configuration
template: src=wordpress.conf dest=/etc/php-fpm.d/
notify: restart php-fpm
roles/php-fpm/handlers/main.yml1
2
3
---
- name: restart php-fpm
service: name=php-fpm state=restarted
roles/php-fpm/templates/wordpress.conf1
2
3
4
5
6
7
8
9
10
11
12
13
14
15
[wordpress]
listen = /var/run/php-fpm/wordpress.sock
listen.owner = nginx
listen.group = nginx
listen.mode = 0660
user = wordpress
group = wordpress
pm = dynamic
pm.max_children = 10
pm.start_servers = 1
pm.min_spare_servers = 1
pm.max_spare_servers = 3
pm.max_requests = 500
chdir = /srv/wordpress/
php_admin_value[open_basedir] = /srv/wordpress/:/tmp
wordpress roles/wordpress/tasks/main.yml1
2
3
4
5
6
7
8
9
10
11
12
13
14
15
16
17
18
19
20
21
22
23
24
25
26
27
28
29
30
31
32
33
34
---
- name: Download WordPress
get_url: url=http://wordpress.org/wordpress-{{ wp_version }}.tar.gz dest=/srv/wordpress-{{ wp_version }}.tar.gz
sha256sum="{{ wp_sha256sum }}"
- name: Extract archive
command: chdir=/srv/ /bin/tar xvf wordpress-{{ wp_version }}.tar.gz creates=/srv/wordpress
- name: Add group "wordpress"
group: name=wordpress
- name: Add user "wordpress"
user: name=wordpress group=wordpress home=/srv/wordpress/
- name: Fetch random salts for WordPress config
local_action: command curl https://api.wordpress.org/secret-key/1.1/salt/
register: "wp_salt"
become: no
become_method: sudo
- name: Create WordPress database
mysql_db: name={{ wp_db_name }} state=present
- name: Create WordPress database user
mysql_user: name={{ wp_db_user }} password={{ wp_db_password }} priv={{ wp_db_name }}.*:ALL host='localhost' state=present
- name: Copy WordPress config file
template: src=wp-config.php dest=/srv/wordpress/
- name: Change ownership of WordPress installation
file: path=/srv/wordpress/ owner=wordpress group=wordpress state=directory recurse=yes setype=httpd_sys_content_t
- name: Start php-fpm Service
service: name=php-fpm state=started enabled=yes
roles/wordpress/templates/wp-config.php1
2
3
4
5
6
7
8
9
10
11
12
13
14
15
16
17
18
19
20
21
22
23
24
25
26
27
28
29
30
31
32
33
34
35
36
37
38
39
40
41
42
43
44
45
46
47
48
49
50
51
52
53
54
55
56
57
58
59
60
61
62
63
64
65
66
67
68
69
70
71
72
73
74
75
76
77
78
79
80
81
82
83
84
85
86
87
88
89
90
<?php
/**
* The base configurations of the WordPress.
*
* This file has the following configurations: MySQL settings, Table Prefix,
* Secret Keys, WordPress Language, and ABSPATH. You can find more information
* by visiting {@link http://codex.wordpress.org/Editing_wp-config.php Editing
* wp-config.php} Codex page. You can get the MySQL settings from your web host.
*
* This file is used by the wp-config.php creation script during the
* installation. You don't have to use the web site, you can just copy this file
* to "wp-config.php" and fill in the values.
*
* @package WordPress
*/
// ** MySQL settings - You can get this info from your web host ** //
/** The name of the database for WordPress */
define('DB_NAME', '{{ wp_db_name }}');
/** MySQL database username */
define('DB_USER', '{{ wp_db_user }}');
/** MySQL database password */
define('DB_PASSWORD', '{{ wp_db_password }}');
/** MySQL hostname */
define('DB_HOST', 'localhost');
/** Database Charset to use in creating database tables. */
define('DB_CHARSET', 'utf8');
/** The Database Collate type. Don't change this if in doubt. */
define('DB_COLLATE', '');
/**#@+
* Authentication Unique Keys and Salts.
*
* Change these to different unique phrases!
* You can generate these using the {@link https://api.wordpress.org/secret-key/1.1/salt/ WordPress.org secret-key service}
* You can change these at any point in time to invalidate all existing cookies. This will force all users to have to log in again.
*
* @since 2.6.0
*/
{{ wp_salt.stdout }}
/**#@-*/
/**
* WordPress Database Table prefix.
*
* You can have multiple installations in one database if you give each a unique
* prefix. Only numbers, letters, and underscores please!
*/
$table_prefix = 'wp_';
/**
* WordPress Localized Language, defaults to English.
*
* Change this to localize WordPress. A corresponding MO file for the chosen
* language must be installed to wp-content/languages. For example, install
* de_DE.mo to wp-content/languages and set WPLANG to 'de_DE' to enable German
* language support.
*/
define('WPLANG', '');
/**
* For developers: WordPress debugging mode.
*
* Change this to true to enable the display of notices during development.
* It is strongly recommended that plugin and theme developers use WP_DEBUG
* in their development environments.
*/
define('WP_DEBUG', false);
/** Disable Automatic Updates Completely */
define( 'AUTOMATIC_UPDATER_DISABLED', {{auto_up_disable}} );
/** Define AUTOMATIC Updates for Components. */
define( 'WP_AUTO_UPDATE_CORE', {{core_update_level}} );
/* That's all, stop editing! Happy blogging. */
/** Absolute path to the WordPress directory. */
if ( !defined('ABSPATH') )
define('ABSPATH', dirname(__FILE__) . '/');
/** Sets up WordPress vars and included files. */
require_once(ABSPATH . 'wp-settings.php');